![]()
The Zone System
One of the most difficult aspects of Photography is calculating the proper exposure that faithfully represents what the photographer saw and felt when he/she took the image. Merely translating the exposure range of the scene to that of the film is a straight forward task, however, making an expressive translation requires sensitivity and mastery of the craft.
During the 1950s, Ansel Adams and Fred Archer?? developed a formal method for establishing the relationship between the luminance values of the scene and the exposure values that the film was capable of recording. Before that time, many photographers relied on "divine inspiration" and practice to get reasonably good exposures. Others relied solely on the the needle reading from light meters that averaged all of the light within a 30-45 degree area. For many of these users who blindly followed the direction of the meter, the expressive Black and White print was almost impossible to attain.
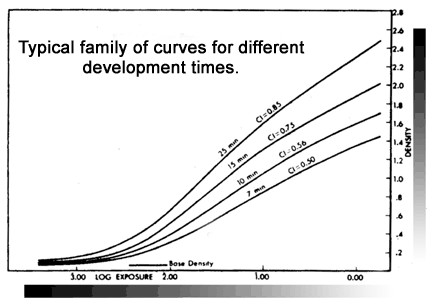
The graph below shows the response of a typical Black and White film. Each curved line represents the film's response when developed for given amount of time. The horizontal axis represents the amount of light hitting the film. Dim light is on the left and bright light in on the right. The vertical axis represents the response of the film. Remember, we're talking about negative images here. Therefore, bright light causes the negative to appear dark, and dim light causes the film to appear light.

The goal of proper exposure for a literal representation is to get the maximum range of light input to fit within the available range of negative densities. Obviously, for creative reasons you may choose to deviate from the literal representation as much as you want.
Changing the development times allows differing luminance ranges to create the same overall range of negative densities. A scene with a wide range of luminance value, let's say from -3.00 to 0.00 on the bottom scale if developed for 7 minutes would give a negative range of approximately 1.2. If a scene only had a luminance range from -3.00 to -2.50, it would require a development time of 15 minutes to get the same range of negative densities.
Ansel's method of calculating the proper exposure and development times is called The Zone System.
Breaking the continuous grayscales down into 10 steps make calculations much easier. Each zone is labeled with Roman numerals ranging from 0 to IX (9), 0 being pure black and IX being pure white, with Zone V (5) being right in the middle. Zone V is important because that is the value we use to determine the aperture and shutter settings on the camera.
All light meters are calibrated to Zone V. That means that the subject which dominates the field of view of the light meter will result in a middle gray value. For example, if you metered a black horse and exposed accordingly, the resulting picture would be that of a middle gray horse. Conversely, metering a white horse would result in a similar middle gray horse. This is why the early users of light meters always had muddy looking, middle gray photographs.
To Be Continued...